You received an email from a law firm.
Your hands are shaking.
"Your website violates the Americans with Disabilities Act. We represent a person with [disability] who cannot use your website. You have 14 days to respond or we will file litigation..."
Your first instinct: Panic.
Your second instinct: Ignore it.
Both are wrong.
This guide tells you exactly what lawyers recommend you do RIGHT NOW.
Not legal advice
You need a real lawyer for that. This is guidance based on what legal professionals consistently recommend to store owners in your situation.
By the end of this guide, you'll have a clear action plan to respond appropriately, protect yourself legally, and resolve this situation.
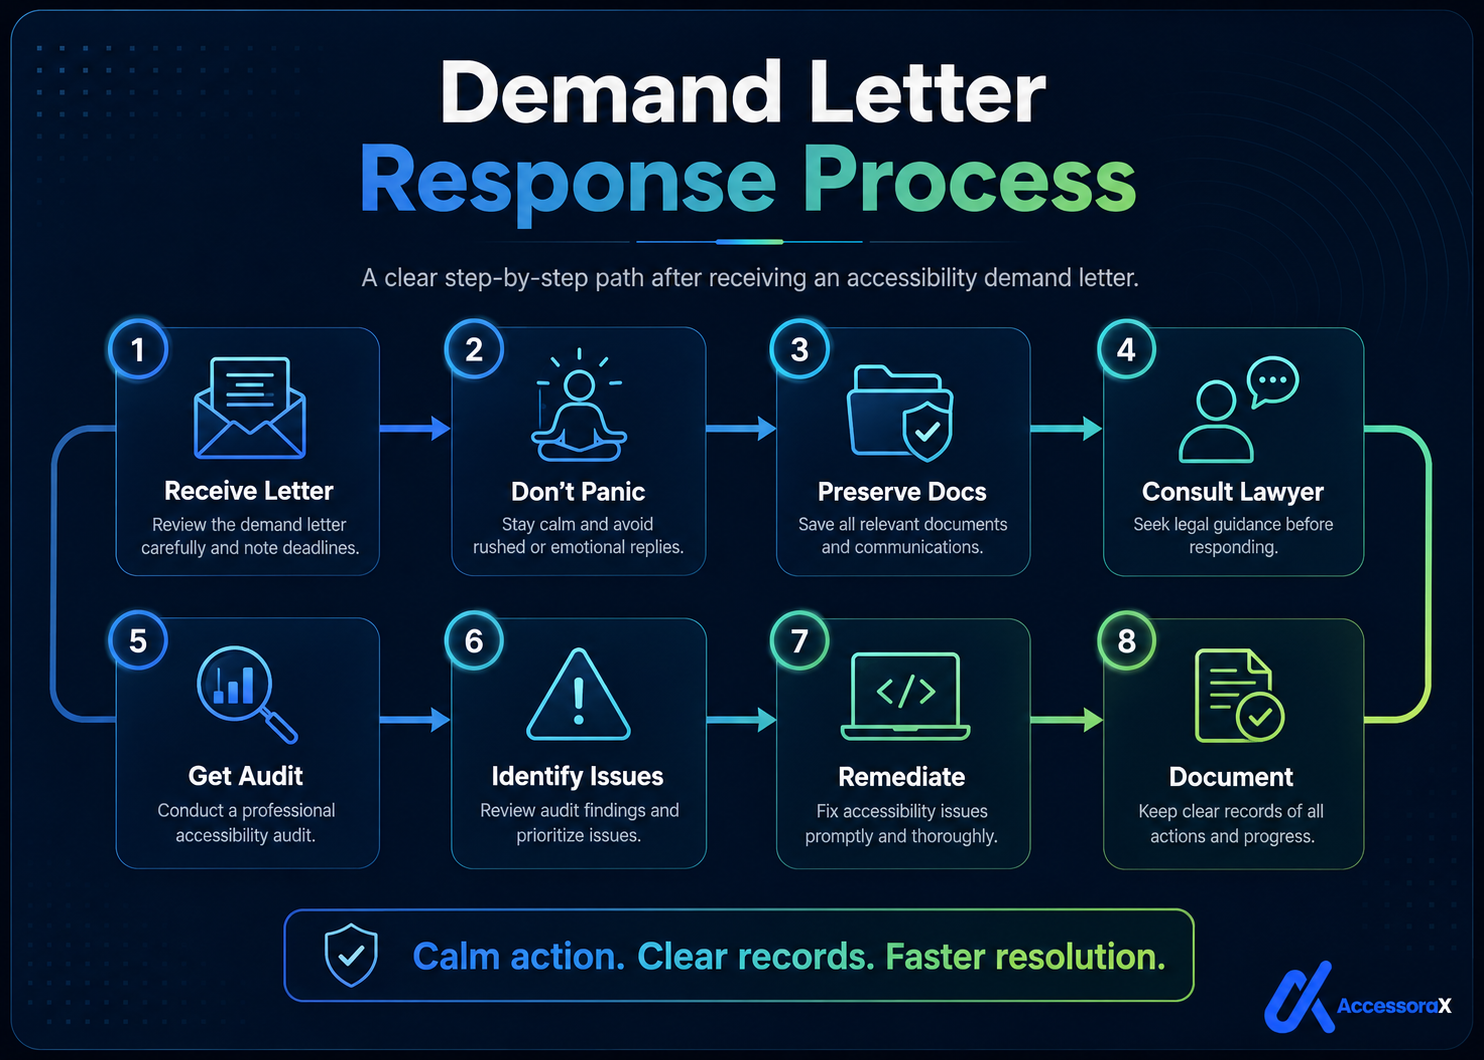
Step 1: Don't Panic (Here's Why)
Why You Shouldn't Panic
Reason 1: This Is Manageable
You received a demand letter. It's scary. But it's not a lawsuit yet.
Demand letters are actually an opportunity.
Why? Because most cases settle before litigation. Litigation is expensive and time-consuming for everyone. Most law firms would rather settle quickly than litigate.
This gives you leverage.
Reason 2: You Can Fix This
Accessibility violations are fixable. Quickly. Affordably.
Unlike some legal problems that require lengthy litigation, accessibility issues can be remediated in 2-4 weeks.
Once fixed, you can demonstrate good faith effort to comply.
Reason 3: Others Have Been Here
Thousands of store owners have received these letters.
Most resolved them. Most paid settlements lower than their panic suggested. Most fixed their sites. Most moved on.
You will too.
What NOT to Do When Panicking
Don't ignore the letter
It won't go away. Ignoring it leads to actual litigation. Worse legal position.
Don't respond emotionally
Don't write angry emails. Don't tell them to "pound sand." Angry responses are used against you in court.
Don't settle immediately
Don't pay settlement same day without talking to a lawyer. Some demands are inflated. A lawyer can negotiate.
Don't assume you'll lose
You have legal rights. You have defenses. You're not automatically guilty.
Step 2: Preserve All Documentation (Immediately)
What lawyers immediately recommend:
Preserve everything related to your website and accessibility.
This is called "preservation of evidence" and it's critical.
Why? Because if the case goes to litigation, you must turn over all documents. If you destroy evidence (even accidentally), courts can impose serious penalties.
What to Preserve
Preserve these RIGHT NOW:
1. The demand letter itself
- Email it came in
- Full text
- Sender information
- Date received
2. Your website backups
- Full backup of current site
- Database backup
- All code and configurations
- Theme and app settings
3. Communication about accessibility
- Any emails discussing accessibility
- Support tickets about accessibility
- Internal conversations about fixing issues
- Any audit reports you've done
4. Analytics data
- Traffic data from last 2 years
- Visitor information
- Conversion data
- Customer data (anonymized)
5. Business records
- Financial statements
- Customer communications
- Server logs
- Update/change logs
6. Design/development records
- Theme selection records
- App installation records
- Customization documentation
- Development decisions
How to Preserve
Digital preservation:
- Create full backup of everything
- Save to external hard drive
- Store in cloud storage (Google Drive, Dropbox)
- Create second backup copy
- Label clearly with dates
Document preservation:
- Print important emails
- Create spreadsheets of communications
- Screenshot website as it currently appears
- Record any video walkthroughs of site
Why this matters:
If litigation proceeds, having organized documentation shows you take things seriously, you're prepared, you're not hiding anything, and you're acting in good faith.
All of these help your defense.
What NOT to Preserve Incorrectly
Don't
- Delete emails (even if harmful)
- Modify documents (changes become evidence of guilt)
- Destroy hard drives (illegal destruction)
- Change your website significantly before legal review
Do
- Freeze your site (don't make major changes)
- Preserve everything as-is
- Let your lawyer review before changes
- Document all preservation efforts
Step 3: Consult With Legal Counsel (Within 3-5 Days)
What lawyers recommend:
Get a lawyer BEFORE you respond to the demand letter. This is critical.
Why You Need a Lawyer
Reason 1: Protect Your Rights
A lawyer ensures your response protects your legal interests.
Without legal review, you might:
- Admit fault unnecessarily
- Agree to unreasonable demands
- Accept liability you could have contested
- Miss settlement negotiation opportunities
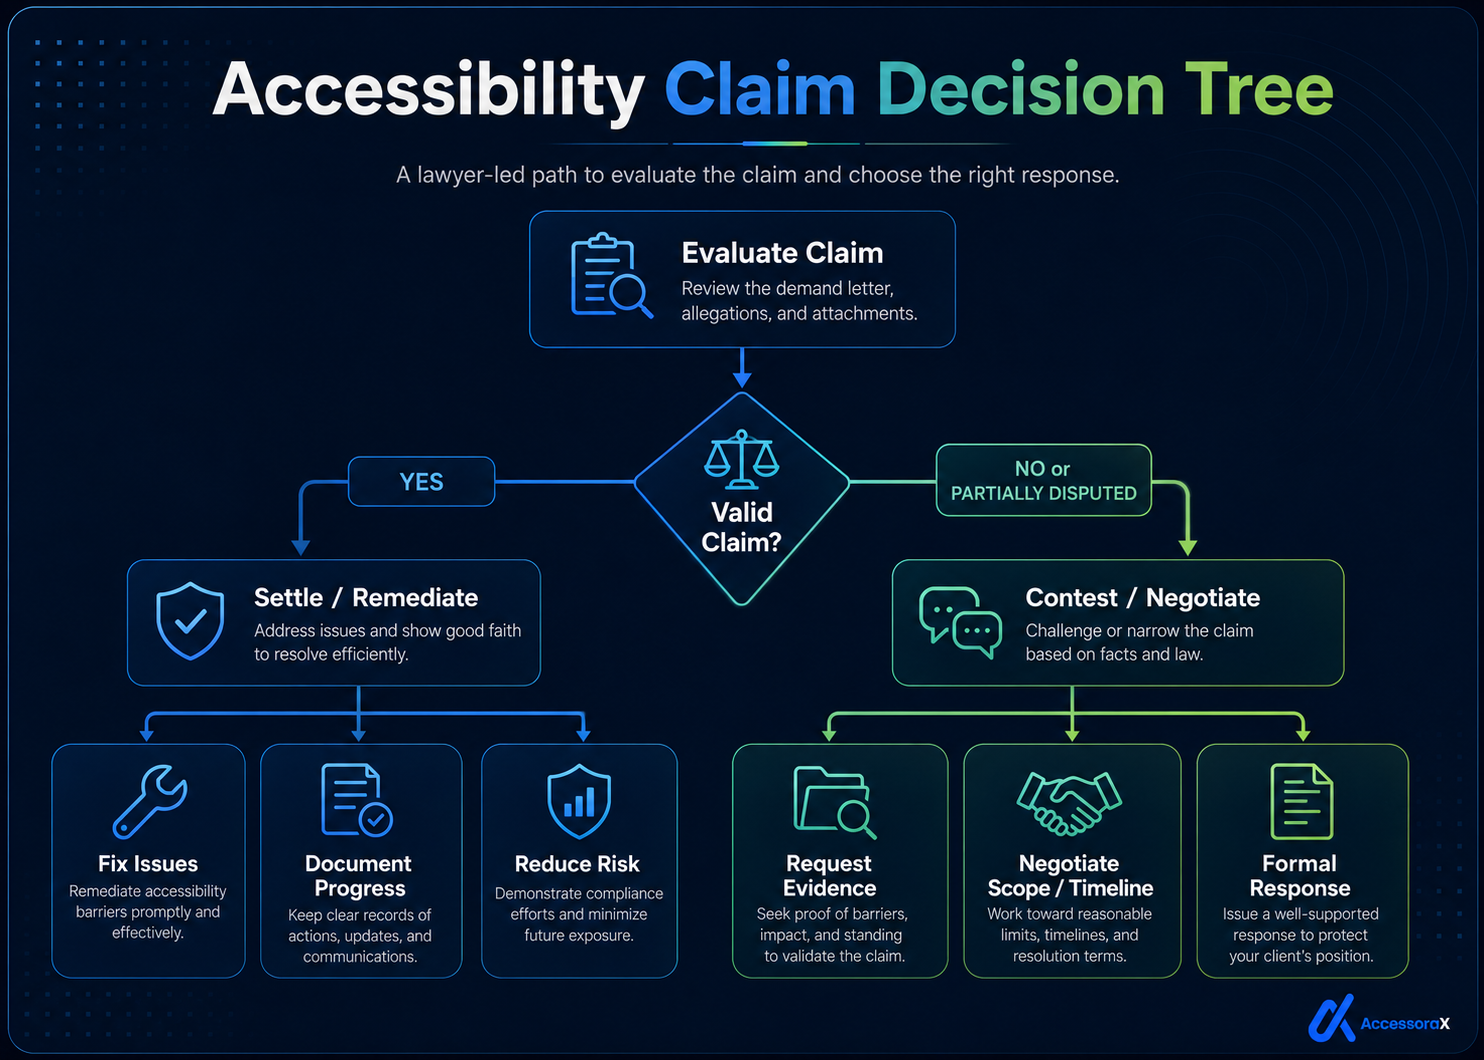
Reason 2: Evaluate the Demand
Not all demand letters are valid.
Some claims are inflated, without merit, unenforceable, or open to negotiation.
A lawyer can evaluate:
- Legitimacy of the claim
- Strength of plaintiff's case
- Whether violations actually exist
- Reasonableness of demands
- Settlement negotiation strategy
Reason 3: Negotiate Settlement
Most cases settle before litigation.
A lawyer can negotiate lower settlement amounts, negotiate payment terms, structure remediation timeline, protect confidentiality, and ensure agreement is legally sound.
Reason 4: Understand Your Options
You have options:
- Settle the case
- Dispute and litigate
- Settle with conditions
- Remediate and request case dismissal
A lawyer explains your options and recommends strategy.
What Kind of Lawyer to Hire
Look for
- Experience with ADA digital accessibility cases
- Experience with website accessibility lawsuits
- Preferably: E-commerce background
- Preferably: Shopify experience
- Local lawyer in your state (important for jurisdiction)
What to ask
- "Have you handled ADA digital accessibility cases?"
- "How many such cases have you handled?"
- "What are typical settlements you see?"
- "What's your approach to these cases?"
- "What's your fee structure?"
| Fee structure | Typical cost |
|---|---|
| Initial consultation | $500-$2,000 (one-time) |
| Settlement negotiation | $2,000-$5,000 (flat fee) or hourly |
| Litigation | $5,000-$25,000+ (depends on complexity) |
Cost vs benefit
Hiring a lawyer ($2,000-$5,000) usually reduces settlement by $5,000-$15,000.
Net savings: $3,000-$13,000. Plus better defense, better terms, better outcome.
Initial Lawyer Consultation
Bring to consultation:
- The demand letter
- Your website URL
- Site traffic/business info
- Any accessibility work already done
- List of apps installed
- Theme information
Discuss: validity of claim, settlement strategy, remediation timeline, cost estimates, next steps.
Expected outcome:
Lawyer will advise whether to settle or contest, the expected settlement range, timeline, action plan, and your legal exposure.
Step 4: Get a Professional Accessibility Audit (Week 1)
What lawyers recommend:
Get a professional accessibility audit before responding to the demand.
Why? Because you need to know what violations actually exist, how serious they are, the cost to fix them, and the timeline to fix them.
This information is critical for settlement negotiation.
Why an Audit Helps Your Defense
Reason 1: Validates or Refutes Claims
The plaintiff claims specific violations. An audit tells you if they're real, if they're serious, and if they're exaggerated.
If they're exaggerated, your lawyer can challenge their claims.
Reason 2: Determines Settlement Reasonableness
If fixing violations costs $200-$500, but plaintiff demands $35,000 settlement, that's unreasonable.
Your lawyer can use this in negotiation.
Reason 3: Identifies All Issues
Professional audit finds ALL violations, not just the ones plaintiff mentioned.
This allows for comprehensive remediation (better defense).
Reason 4: Creates Documentation
Professional audit creates dated report showing violations found, severity, fixes needed, and timeline.
This documentation proves you took action.
What to Look For in an Audit
Good audit
- Detailed violation list
- Severity ratings (critical/high/medium/low)
- Screenshots/examples of violations
- Specific fix recommendations
- Timeline to fix
- Cost estimates and priority order
- Shopify-specific violations
Red flags
- Audit that just says "50 violations" with no detail
- No breakdown by type
- No fix recommendations
- No timeline
- Generic template (not Shopify-specific)
Get professional audit from experienced firm →
Step 5: Identify Technical Barriers (Week 1-2)
What lawyers recommend:
Work with your lawyer and accessibility professional to identify exactly which technical barriers exist, how they affect disabled users, which are most critical, and which are easiest to fix.
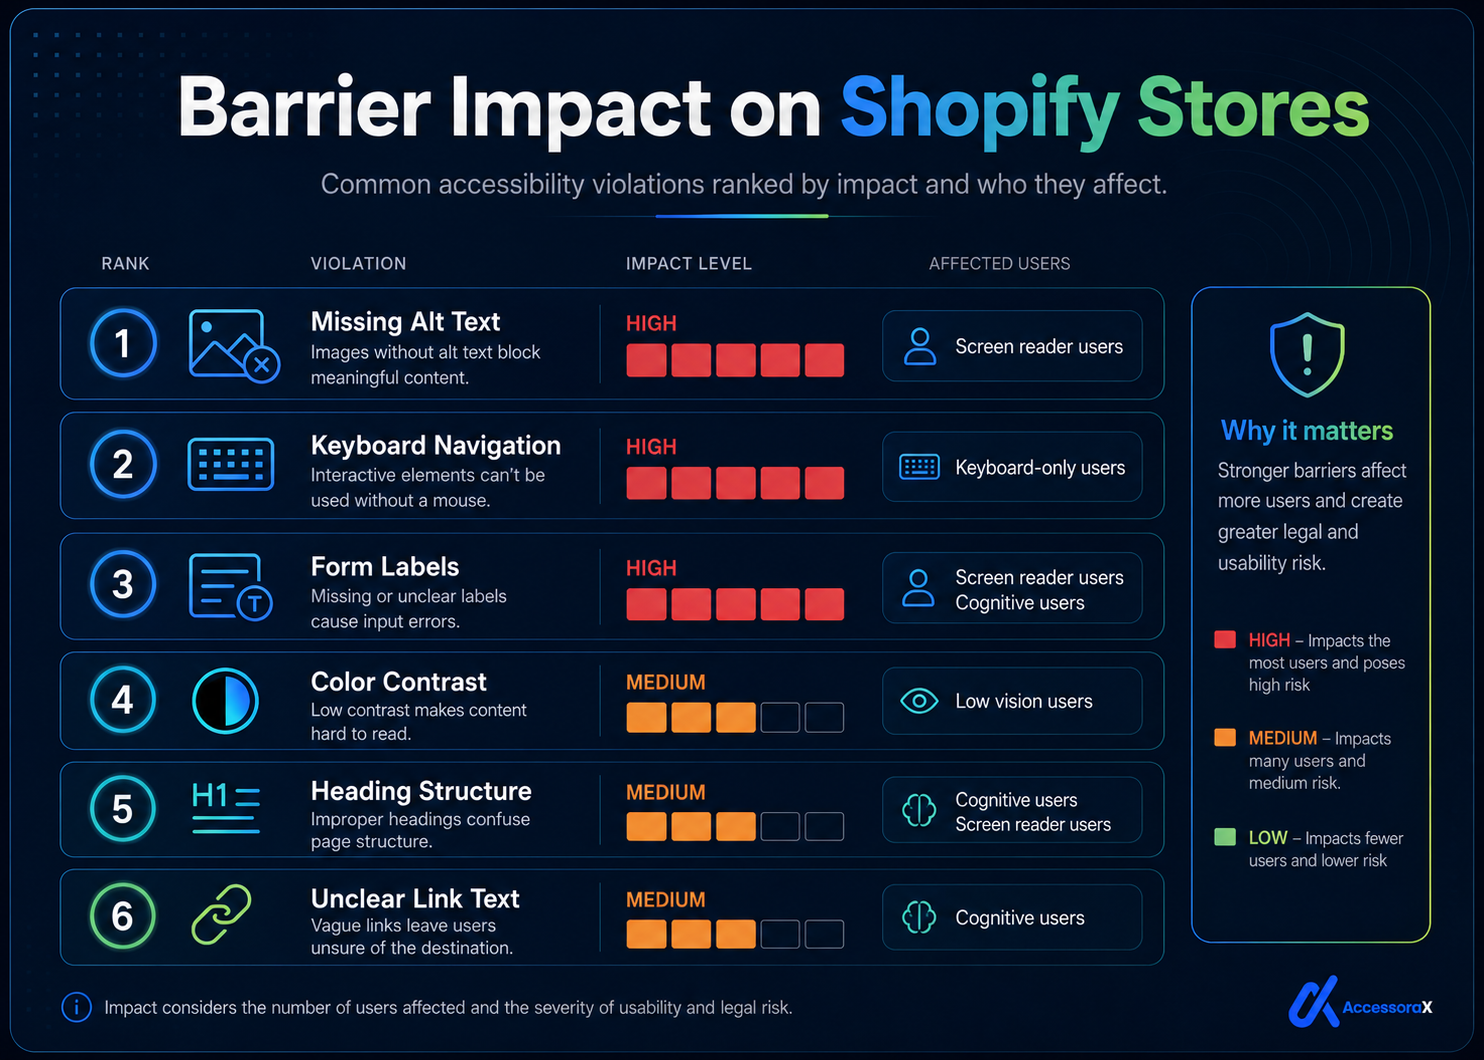
Most Common Barriers in Shopify Stores
Critical barriers (usually mentioned in demand letters):
1 Missing Alt Text on Product Images
- Blind users can't see products
- Impact: Can't shop
- Fix difficulty: Easy · Timeline: 1-2 hours · Cost: $0-$200
2 Checkout Not Keyboard Accessible
- Motor-disabled users can't complete purchase
- Impact: Can't checkout
- Fix difficulty: Medium · Timeline: 2-4 hours · Cost: $0-$500
3 Form Fields Without Labels
- Screen reader users don't know what to enter
- Impact: Can't fill forms
- Fix difficulty: Easy-Medium · Timeline: 1-3 hours · Cost: $0-$300
4 Color Contrast Failures
- Low-vision users can't read text
- Impact: Hard to read product info
- Fix difficulty: Easy · Timeline: 1-3 hours · Cost: $0-$200
Prioritization
Lawyers recommend fixing in this order:
- Critical (Fix first) — Blocks access to core functionality
- High (Fix second) — Blocks access to important features
- Medium (Fix third) — Impacts experience for some users
- Low (Fix last) — Minor impacts
Your accessibility professional should provide this prioritization.
Step 6: Develop Remediation Plan (Week 2)
What lawyers recommend:
Create a detailed remediation plan showing what will be fixed, timeline for fixes, responsible party (you vs professional), cost, and testing/verification process.
Remediation Plan Components
Your plan should include:
Benefits of Having a Plan
When you send this plan to plaintiff's lawyer, they see:
- You acknowledge the problem
- You're fixing it (good faith)
- You have specific timeline
- You're being reasonable
- You're a reasonable negotiating partner
This often leads to:
- Lower settlement demands
- Agreement to dismiss if you comply
- Structured settlement (payment over time)
- Confidentiality clause
Role of Accessibility Professional
A good accessibility professional identifies all issues, provides fix recommendations, estimates cost and timeline, can execute fixes, and can verify compliance.
You need both: a lawyer (for legal strategy) and an accessibility professional (for technical fixes). They work together to resolve the situation.
Need a professional to handle technical remediation?
They handle the technical work while you work with your lawyer on legal strategy. Faster resolution. Better outcome.
Work with accessibility professionals →Step 7: Execute Remediation (Weeks 2-4)
What lawyers recommend:
Fix issues QUICKLY according to your timeline. Don't delay. Courts look unfavorably on slow responses.
Remediation Timeline
- Add alt text to product images
- Fix color contrast issues
- Add form field labels
- Fix keyboard navigation
- Make dropdown menus keyboard accessible
- Fix navigation structure
- Professional re-audit
- Verification testing
- Final compliance confirmation
Documentation During Remediation
As you fix issues, document:
- What was done — specific issue fixed, how it was fixed, code changes (if applicable), screenshots before/after
- When it was done — exact date, time invested, person responsible
- How it was verified — testing method, tool used (WAVE, screen reader, etc.), results, screenshots
- Cost — professional fees (if any), tools/resources used, total investment
This documentation is your evidence of good faith effort.
Step 8: Document Your Work (Week 4)
What lawyers recommend:
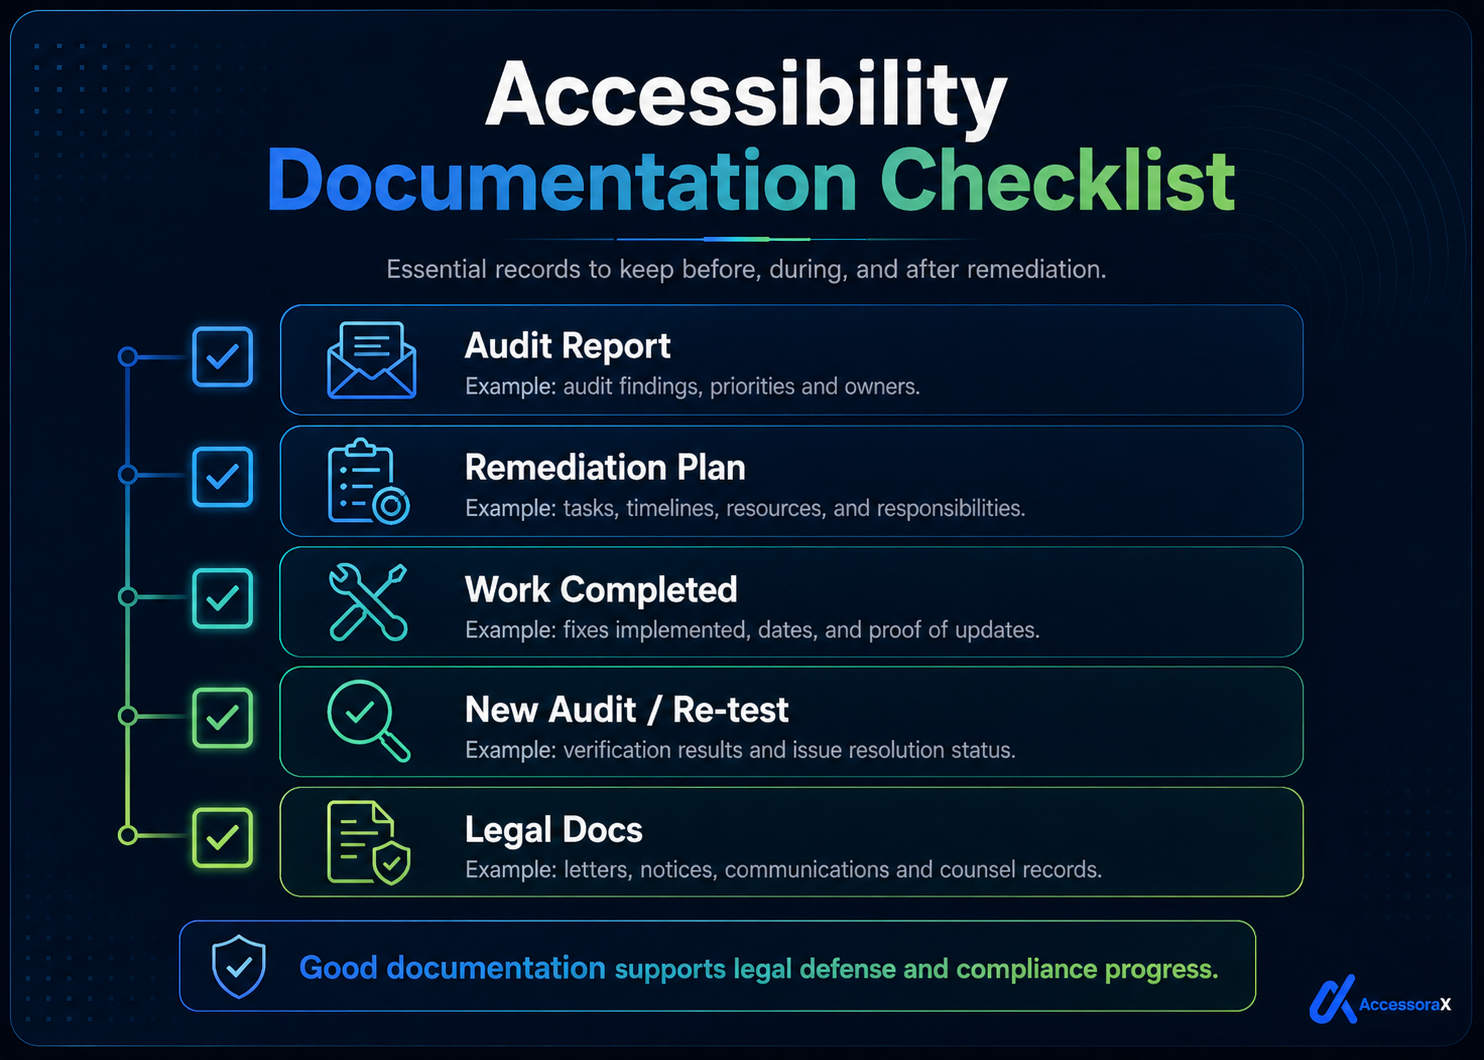
Create comprehensive documentation package showing the original audit, remediation plan, work completed, new audit, and legal documentation.
Documentation Package Contents
Create a folder containing:
1. Professional audit report
- Original audit showing violations
- Dated report
- Professional letterhead
- Detailed findings
2. Remediation documentation
- List of issues fixed
- Timeline of fixes
- Screenshots before/after
- Testing results
- Cost documentation
3. Compliance verification
- New audit showing compliance
- WAVE scan results (0 red violations)
- Screen reader testing notes
- Keyboard navigation verification
- Color contrast verification
4. Legal documentation
- Demand letter (original)
- All correspondence with plaintiff
- Settlement agreement (if applicable)
- Legal advice documentation
- Dated compliance certification
Benefits of Documentation
This package demonstrates you took concerns seriously, acted quickly, fixed issues properly, verified compliance, and are committed to ongoing accessibility.
If the case goes to litigation
- Shows good faith effort
- Demonstrates compliance
- Reduces damages
- Supports your defense
If settlement is negotiated
- Justifies your settlement position
- Proves compliance with agreement terms
- Protects you if they claim breach
Step 9: Respond to Plaintiff (Week 1)
What lawyers recommend:
Have your lawyer send a response letter to plaintiff. Don't respond yourself. Let your lawyer handle it.
What the Response Should Say
Your lawyer should tell them:
Key Points Lawyer Makes
- You're taking it seriously
- You've taken immediate action
- You have specific plan and timeline
- You're being reasonable
- You want to resolve it
These points often lead to lower settlement demands, acceptance of your timeline, and agreement to dismiss upon compliance.
What to Expect Next
Scenario 1: Plaintiff Accepts Your Proposal
- Week 1-2: Negotiation
- Week 3: Settlement agreement signed
- Week 3-6: You execute remediation
- Week 6-7: Verification
- Week 7: Case closed
Your cost: Settlement amount (usually $8,000-$20,000)
Scenario 2: Plaintiff Counters Your Proposal
- Week 1-2: Counter-proposal received
- Week 2-3: Negotiate
- Week 3-4: Settlement reached
- Week 4-8: Remediation
- Week 8-9: Case closed
Your cost: Settlement amount (usually $12,000-$25,000)
Scenario 3: Plaintiff Rejects Settlement
- Week 1-2: Rejected
- Week 2-4: Plaintiff files lawsuit
- Month 3-12: Litigation (discovery, depositions, etc.)
- Month 12+: Settlement or trial
Your cost: $25,000-$60,000+ (legal fees + settlement)
Critical Mistakes to Avoid
Mistake 1: Responding Without a Lawyer
Problem: You write response yourself, admitting fault, agreeing to unreasonable terms.
Solution: Let lawyer handle all communications.
Mistake 2: Ignoring the Letter
Problem: Shows bad faith, leads to worse legal position.
Solution: Respond quickly and professionally.
Mistake 3: Delaying Remediation
Problem: Plaintiff sees you're not serious, increases demands or files suit.
Solution: Start fixing issues immediately.
Mistake 4: Installing "Fix Everything" Widgets
Problem: Courts have ruled these don't work. May increase liability.
Solution: Fix actual issues instead.
Mistake 5: Destroying Evidence
Problem: Illegal. Courts impose serious penalties.
Solution: Preserve everything related to website and accessibility.
Mistake 6: Making Major Website Changes
Problem: Looks like you're hiding something.
Solution: Freeze site, make only necessary accessibility fixes.
Mistake 7: Posting About It Online
Problem: Creates public record of dispute, damages brand.
Solution: Keep it confidential, don't discuss publicly.
Timeline Summary: First 30 Days
Week 1
- Day 1: Receive letter
- Day 1-2: Don't panic, preserve documentation
- Day 2-3: Consult with lawyer
- Day 3-4: Get professional accessibility audit
- Day 5-6: Review audit results with lawyer
- Day 7: Lawyer sends response letter with plan
Week 2-3
- Negotiate with plaintiff
- Execute quick-fix remediation (alt text, color contrast)
- Start complex fixes (keyboard navigation)
- Document all work
Week 4
- Complete all remediation
- Professional re-audit
- Verify compliance
- Settlement agreement (hopefully)
- Create documentation package
Final Advice: Don't Panic. Take Action. Get Help.
You received a demand letter. That's scary. But it's manageable.
What to do:
- Take a deep breath
- Hire a lawyer immediately
- Get an accessibility audit
- Fix your site
- Document everything
Timeline: 4-6 weeks to resolution
Cost: $8,000-$25,000 settlement + $200-$500 remediation
Better than: Ignoring it ($25,000-$60,000 litigation)
You have this. Get professional help. Execute the plan. Move forward.
Thousands of store owners have been exactly where you are. They got through it. So will you.
Facing a demand letter right now?
Start with comprehensive audit to understand your violations. Professional team can guide remediation while your lawyer handles the legal side.
Get immediate professional help →Want to understand what they found in your site?
Read our WCAG 2.1 requirements guide →
This explains exactly what standard lawyers and courts use.